

Tuesday, December 31, 2013
2013 REVIEW AT THRIFTY PARSONAGE LIVING
It's hard to believe that 2013 is already coming to a close. With the new year right around the corner, it has us looking back at what the years has held. Below you will find a collection of events and projects that have happened at Thrifty Parsonage Living.

Thursday, December 26, 2013
HOT COCOA BAR
I had a wonderful and blessed Christmas and I hope you had the same. It's hard to believe Christmas has already come and gone. Today I thought I'd share my cocoa bar from our Christmas party. We had a large party of twenty five guests for Christmas at our home. I set up a Cocoa bar as part of our beverage serving area.
I got very busy with last minute preparations before our guests arrived, so I only got a few photos of the area. They may not be the best photos, but a least you can see what the bar looked like.

You may recognize the snowflake buckets from my Christmas Home Tour. They are filled with candy canes, peppermint candies and jingle bells. The counter had snow flakes purchased at the Dollar Store scattered around on top of white quilt batting.

You may recognize the snowflake buckets from my Christmas Home Tour. They are filled with candy canes, peppermint candies and jingle bells. The counter had snow flakes purchased at the Dollar Store scattered around on top of white quilt batting.
Wednesday, December 25, 2013

Monday, December 23, 2013
DIY CHRISTMAS CARD DISPLAY
I created a new display for our Christmas cards this year. You may have seen it in my 2013 Christmas Home Tour. A few years ago, I used a made over shutter to display my cards. It worked out great for that year, but we've been receiving more cards this year and I needed something larger to display our cards on.

Here's what I came up with.

Friday, December 20, 2013
OH HOLY NIGHT CHRISTMAS CANVAS ~ twinkling stars
In my recent Christmas Home Tour, you may have noticed several projects that I created ~ DIY. One of these projects can be seen as soon as you come in our front door ~ The Oh Holy Night Canvas.


Tuesday, December 17, 2013
2013 CHRISTMAS HOME TOUR

Welcome to our home! If your are a new visitor here, I'm so happy you stopped by. If you're a regular visitor here, thanks for coming back for a visit. Christmas is such a wonderful time of the year; and I love getting our home ready for the festive holiday. I'll be joining other bloggers seeing their tour of homes. So today I'll share my home as it's all decorated for the holidays.
Most of my Christmas decor is centered around a Winter Wonderland theme this year.
Thursday, December 12, 2013
DIY FAUX FUR CHRISTMAS PROJECTS ~ {Fur tree, Fur topped stocking, Fur wreath, & Fur pillow}

In my last post, I said that I would show you how I created my faux fur Christmas projects.
It all started when I made my Faux Fur Tree Skirt, and had left over fabric. I love the fabric, and really didn't want to waste any of it. It comes with a price tag of $20 a yard, but I got my yard and a quarter @ 65% off on a Veteran's day sale. I was able to make quite a few projects with the remnants,
Monday, December 9, 2013
FAUX FUR CHRISTMAS DECOR

Oh, the weather outside is frightful, but the fire is so delightful, since we have no place to go, let it snow, let it snow , let it snow!
(written by Sammy Cahn and Jule Styne 1945)

We woke up this morning to four degree temperature and a wind chill of - 27 degrees Fahrenheit. Now that's cold !!!! for this girl having moved from the Pacific Northwest where temperatures are very mild in the winter. With that being said, I find it very fitting to continue showing you my winter themed Christmas decorations. In my last post, I showed you the Fur Tree Skirt I made. The tree skirt was cut in a circle leaving quit a bit of fabric around the edges. Faux Fur is perfect for holiday decor; and I thought there is no since in wasting this lovely fabric. It's warm and fuzzy resembling snow and adding a festive design perfect for the season. I decided to make a few additional projects from the fabric.
Here's what I created:
A Faux Fur Pillow

and
Thursday, December 5, 2013
DIY NO SEW FAUX FUR TREE SKIRT

We woke up to snow on the ground this morning. There's nothing like beautiful snow covered ground to get you in the mood for winter and Christmas decorating. Since we're in a new parsonage this year and not enough room for our large Christmas tree that we've used other years. We decided to buy a new smaller tree. It was while shopping at Wal-Mart that we found the perfect little tree. It's an artificial six foot flocked tree with a smaller circumference. I've been wanting to do a winter theme Christmas in our living room this year, and this tree was just perfect. The past few years we didn't have a tree skirt and I improvised by using a table runner wrapped around the tree. I thought a beautiful white fur skirt would look lovely under our new flocked tree.
Wednesday, November 27, 2013
WREATH PILLOW
Guess what I found today while browsing the internet. Another pillow that looks like mine. You can find it at Joss and Main. It's normally priced at $57.50 on sale for $28.95, but you can still make your own for less by following my instructions.


To get full instructions on making your own
Wednesday, November 20, 2013
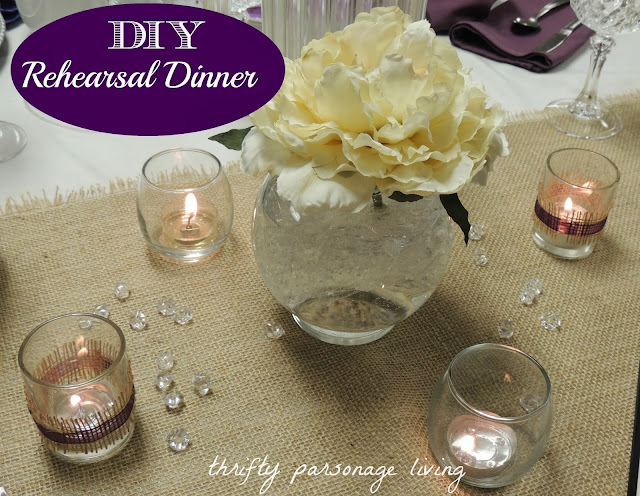
DIY CENTERPIECE FOR A FORMAL DINNER ~ REHEARSAL DINNER
I'm continuing on with my series, Rehearsal Dinner On a Budget. In my previous post I shared my DIY Centerpiece Burlap Cake. Today I'll be showing you a very simple centerpiece, that I used as centerpieces on the tables at the rehearsal dinner. If you need a centerpiece for thanksgiving, Christmas, a bridal shower or wedding. This centerpiece could work for you. The possibilities for where to use it are endless.

The great thing about this centerpiece is how fast and easy it is to make, along with being inexpensive yet elegant.

The items you will need to make this centerpiece -
Friday, November 15, 2013
POTTERY BARN WREATH PILLOW KNOCKOFF
It's been almost two years ago since I first saw a beautiful wreath pillow at Pottery Barn. The beautiful tone on tone pillow is still on my mind almost two years later.
You can imagine my disappoint to find out that it's no longer available, but then I thought to myself: "I can make that"! We woke up to snow last week and four degree temperatures this week; and because of the cold outside, I started to think about Christmas and winter projects. It was the perfect time for me to try making a pillow. While browsing on Pinterest, I saw a few knockoffs for this pillow, one of them from The Decorated House.
Here's what I did to create my own version of the pillow.
I gathered supplies that I had around the house.
Wednesday, November 6, 2013
DIY CENTERPIECE BURLAP CAKE

Welcome to Wedding Wednesday ! If you're like a lot of people now days, you're working on a limited budget. That's our situation, but it doesn't mean that our parties, receptions or dinners have to look cheap or go without any decor. DIY projects are just the solution to stay within the budget, and that's exactly what I did for the Rehearsal Dinner we hosted for our son and daughter-in-law back in June. If you missed the post with all the details, you can see it at my last post DIY Rehearsal Dinner On a Budget (part 1).
Today, I'll be sharing a tutorial for the faux cake I made for the centerpiece on the dessert table.
Wednesday, October 30, 2013
DIY REHEARSAL DINNER ON A BUDGET (part 1 decor)
Hi everyone! In my last post DIY Burlap Pumpkin, I told you that I've been making a lot of projects using burlap since the rehearsal dinner we did back in June for our son and daughter-in-law. I know this post is long over due, but I thought I'd share it today as people have been asking about it. My plan is to feature posts once again in my
Today I'll start with....
We gained some experience decorating and hosting dinners on a small budget with our two daughters' weddings. ( If you've been reading this blog for a while, you will remember that they were married within a month of each.) You can read all about how we did the weddings on a budget: just click on Wedding Wednesday in the side bar or on the photo DIY Weddings on a budget . The rehearsal dinner for 45 guests seemed relatively small compared to wedding guests numbering 200 and 300 people. If you're planning on doing your own rehearsal dinner, you may be comforted to know that even though there is work involved, it's also a lot of fun preparing and decorating for the happy occasion.
Our rehearsal dinner all started because
Wedding Wednesday Series
Today I'll start with....
DIY - How to have a rehearsal dinner on a limited budget.

Our rehearsal dinner all started because
Tuesday, October 22, 2013
DIY BURLAP PUMPKIN (EASY - NO SEWING REQUIRED)
I've been on a little decorating binge using burlap. I used burlap for the table decor at the rehearsal dinner for our son and daughter-in-law and have some leftover burlap. I showed you how to make a burlap table runner a few months ago. (I know I'm a little late but I do plan to share with you soon the rehearsal dinner decor.)
Because I'm in the fall mood, I thought it would be fun to try and make a burlap pumpkin. I've seen a few you can buy but they tend to be a little costly. I'd like to show you my cheaper and easy burlap pumpkin I made.

Below is the list of items I used to make this burlap pumpkin.
Because I'm in the fall mood, I thought it would be fun to try and make a burlap pumpkin. I've seen a few you can buy but they tend to be a little costly. I'd like to show you my cheaper and easy burlap pumpkin I made.

Below is the list of items I used to make this burlap pumpkin.
Tuesday, October 15, 2013
DIY CHAIR SLIPCOVER
Last week I got an email from my sister telling me about some fabric she'd found at Hancock Fabric. She has been wanting to make a slip cover for one of her chairs. Being a thrifty shopper like me, she went to check the fabric on the clearance table, and found a piece of upholstery fabric. The fabric was the color she was looking for, and there were 3 yards. To top it off, the clearance price was $5 per yard. And then, when she went to check out, she was greeted with yet another surprise. The clerk told her she could use her 50 % off coupon on clearance items making the fabric only $2.50 a yard. What a great deal!
Since she has never made a slipcover for a chair, she asked for my help; and I agreed. What a fun way to spend the day with your sister! I'll take any opportunity I can to get together with both my sisters after living 1700 miles away from them for 16 years. Both of us have reupholstered a sofa; and I've done a few chairs as well. (You can see how I reupholstered my wing-back chair here.) We've also have both made slipcovers for pillows, but neither of us have made a slipcover for a chair. It was a learning experience for the both of us, so today I thought I'd share with you how we made the slip cover.

Here's the chair we started with.
Wednesday, October 2, 2013
MY HIGH LOW PROJECT
I've been looking for some time now for a small side table or nightstand. My husband works on his laptop quite often in the evening while sitting in our family room. He has to frequently run to his office for supplies: pens, stapler, calculator etc. A small chest or night stand to sit next to his chair would be the perfect solution to store a few supplies. I finally found what I was looking for on Craigslist for ten dollars.
It was in pretty bad shape, but I knew I would be able to fix it with a little TLC and paint.

It was in pretty bad shape, but I knew I would be able to fix it with a little TLC and paint.

The top looked bad too!
Friday, September 13, 2013
FALL DECORATING FOR THE HOME
Even though the temperature out side does not show it (90 degrees), summer is quickly drawing to an end and fall is fast approaching. We just returned from a two week trip to see our family and friends in Washington state. It's hard to believe we're almost to the middle of September already - seems like summer just flew by !
I love fall and all the vibrant colors that come with the change of season. Autumn is a great time to bring the red, yellows, brown and orange colors into your home along with elements from nature like pumpkins, gourds, leaves, branches and pine cones. I did just that yesterday. Here is a little sneak peak of what I did.

I love fall and all the vibrant colors that come with the change of season. Autumn is a great time to bring the red, yellows, brown and orange colors into your home along with elements from nature like pumpkins, gourds, leaves, branches and pine cones. I did just that yesterday. Here is a little sneak peak of what I did.
Starting in the dining room.

I used one of the burlap table runners I made for rehearsal dinner. I then made a floral arrangement using flowers also left over from the rehearsal dinner. To give it a touch of fall, I simply wrapped it with some orange fabric.
Monday, August 19, 2013
USE FOR MASON JARS BEYOND CANNING
While working on caning my beans this week, I thought about how the mason jars have taken on so many more uses over the years other than just jars for canned goods. Today I thought it would be fun to share some of the uses for mason jars that I've done myself.
Two zinc lid pint jars displayed in a small wire basket in our dining room.

Candle light
Thursday, August 8, 2013
A BEDROOM TRANSFORMATION
It's great to be back as it's been quite some time since my last post. I took a little blog vacation and worked on getting some projects finished around the Parsonage.
I'm sure many of you have thought I'd total forgotten to show you transformations that have taken place since February when we moved into the Parsonage. Today I'd like to share the smallest bedroom in the Parsonage. When we lived here before, this room was our son's nursery. It's hard to believe how time flies and he's now in college.
When we moved here, the room had peeling wallpaper on the lower half of the walls. I'm very thankful for a few ladies from the church who labored away and got it removed from the walls before our arrival. This is how the room looked the day we moved in...

wall paper paste and old paint on the walls as well as the old window.
Saturday, July 6, 2013
DIY BATHROOM MAKEOVER
Since our move in February, I've been working fast and furious at getting everything unpacked, and started right into painting projects. I wanted our home to be ready for all the guests coming for our son's wedding. In spite of my best efforts to have everything done before the wedding, however, there was still a half bath that needed some TLC. Since I was missing our children and grandchildren, I thought a little project would help get my mind off of missing them.

Our half bath was the perfect project.

Our half bath was the perfect project.
Tuesday, June 11, 2013
PAINTING HORIZONTAL STRIPES ON WALLS (DIY)

I love the look of stripes on walls. Stripes can be horizontal or vertical, wide or narrow, soft and subtle or bright and bold. Stripes can add something unexpected to an area making a small area appear larger, for example. Vertical stripes can make a room look taller and horizontal stripes make a room look wider. Stripes on walls has been around in the decorating world for some time, but it's a first for me. Today I thought I'd share how I painted horizontal stripes in my back entry hallway.
Wednesday, May 29, 2013
SMALL BUDGET BUT BIG IMPACT {STAIRS MAKEOVER}
I really wanted to make over the stairway to our basement. All the guest bedrooms are in the basement, so this area will be seen by everyone coming to stay at our home. When we lived in this house previously, the entire stairway and basement was carpeted, but sometime between then and now the carpet has been removed leaving the stairway to look like this.

Not my favorite choice of style with speckled paint on the stairs (it looked like paint splashed all over the stairs and basement floor).
Monday, May 20, 2013
NEW WINDOWS
The best project to have completed is the windows. Back at the end of February and first of April the construction began on the Parsonage. The siding and windows were removed and replaced with new. Since then this is how our windows have looked, no casing or trim.


Every evening we hung table clothes, sheets and drop cloths over the windows for privacy.
Thursday, May 9, 2013
DO YOU USE GOOGLE READER?
The announcement came back in March that Google Reader will retire as of July 1, 2013.
I personally am sad to see it going away. It seems like when you've learned how to use something in blogshere, they take it away or change it. I've been doing a little research since the announcement and found this article about some options to use in place of Google Reader.
I have decided I'll be following my favorite blogs using Bloglovin, since I've followed a few fellow bloggers there already, and I'm already a little familiar with the site. I just went to this page and did an import from my Google Reader account to Bloglovin.
If you currently follow Thrifty Parsonage Living
via Google reader.
I hope you'll still follow along via Bloglovin or
you can also follow me using Linky or another feed source.
You can find my buttons over on the right side of this page,
listed under
Subscribe
and
Follow Me.
Have you found another way to follow along? I'd love to hear from you.
Have a great day!
Joy
Tuesday, May 7, 2013
PAINTING, PAINTING AND MORE PAINTING
Have you been wondering what I've been up to this past week? I've told you that almost every room in the Parsonage is getting a makeover with paint. This past week, I've been painting in one of the basement bedrooms.
Here's a little reminder of what the room looked like before we started priming all the walls.

Here's a little reminder of what the room looked like before we started priming all the walls.

A bright sun and clouds on the ceiling.
Monday, April 22, 2013
LIVING ROOM REVEAL
After a lot of labor pealing off a wall paper boarder that had been painted over, the new paint color is on the walls and it looks wonderful! It is a soft gray, (Portand by Valspar); and the ceiling is a bright white ceiling paint. I love how it brightens up the room!


We took down the old curtains and put up new blinds.
Friday, April 19, 2013
DIY BOOKCASE MAKEOVER
I know you haven't heard from me lately, but life in our new parsonage has been very busy. Not only did we have to unpack all our household items, but we've had so many projects going on. Almost every room in the house is getting repainted. The living room is finally coming together; and I'll be sharing the room reveal soon!
Here's a to do list for the room.

Did you happen to notice the bookshelf on the right side of the picture?
Here's a to do list for the room.

Did you happen to notice the bookshelf on the right side of the picture?
Tuesday, April 16, 2013
DECORATING PUT ON HOLD
My house decorating was put on hold this past week because of bad weather. We've had quite the ice storm, and I'm starting to wonder if it really is spring. It started last week Tuesday morning with freezing rain followed by snow. We lost our electricity Tuesday evening and didn't get it back until Saturday evening. No electricity = no Internet connection and explains why you haven't seen any posts for a while. We were so thankful to have a generator. We were able to alternate having our furnace on and kept our refrigerator and freezer running. This is the worse ice storm I've ever seen in my lifetime. The trees received major damage! I don't think there is a street in town without tree limbs down. We lost a large limb on a tree in our back yard. It missed hitting our new patio door by mere inches.

This is how our bushes all looked - totally covered with ice.


This is how our bushes all looked - totally covered with ice.

Tuesday, April 9, 2013
CHOOSING THE RIGHT PAINT COLOR
When decorating, choosing the right paint color can be difficult. In my last post I told you that I've been struggling with the correct paint color for the kitchen and my office. I can envision in my mind what I want, but I've been struggling to find that perfect paint. Paint sets the mood for a room, and it's important to remember the other colors in the room. Tip: think of upholstered items, counter tops and fabrics in curtains and drapes as the "artist's palette" from which to select potential colors for your walls.
Keeping that in mind, I've found it very difficult in our kitchen because I don't want the color to conflict with the counter. The counter has dark green, light green, taupe, and a little black in it.

While the vinyl floor covering has shades of green and
Keeping that in mind, I've found it very difficult in our kitchen because I don't want the color to conflict with the counter. The counter has dark green, light green, taupe, and a little black in it.

While the vinyl floor covering has shades of green and
Wednesday, April 3, 2013
LET THE CONSTRUCTION BEGIN
The old saying it has to get worse to get better is true for our home. The construction or should I say destruction has begun.

They have begun the removal of the siding and take out the old windows.

They have begun the removal of the siding and take out the old windows.
Tuesday, March 26, 2013
HOME TOUR [part 3]
Today you'll finally get to see the rest of our home - The Parsonage. I left off last time showing you the bedrooms .
I've found a photo of the 5th bedroom since my last post. I'll begin the tour today with that photo, and move on to the bathrooms and the rest of the basement.
 The church is still in the progress of finishing this room. The room was a larger room with cement block walls and a small closet. They have moved one wall over and added insulation, dry wall, new closet and new escape window. The room still needs all the trim work, baseboard and flooring.

Monday, March 18, 2013
HOME TOUR OF THE PARSONAGE {part 2}
Today I'd like to continue with the tour of our new home/parsonage. Last week I showed you the living room, dining room and kitchen. Today I'll show you the bedrooms. First I'll take you down the hall to view three of the bedrooms.
The hallway to the bedrooms is just off of the dining room. The same paint color and stencil design (only minus the berries and leaves) from the kitchen and dining room continues down the hallway. The first door on the left is a linen closet and the door on the right is to the main bathroom. The next two doors on the right are bedrooms and on the far left is the master bedroom. The hallway and bedrooms have hardwood floors. The hallway floor has been refinished, but the bedrooms floors need refinishing. They are on our to do list for this summer.

The first bedroom on the right is the smallest of the bedrooms and had wallpaper on the lower half of the walls along with a boarder.
Wednesday, March 13, 2013
PARSONAGE HOME TOUR
I know you've all been waiting a long time for a tour of our new home/Parsonage. Today I'll begin a tour of this 1960's ranch 5 bedroom two and half bath home. The photos of the home where taken back in August 2012 when we flew out to meet with the church council and stayed in the Parsonage for a few days. I have a limited number of photos, because they were taken with my old camera and it was acting up at the time. I'll show you these photos and later show you what we have done to change the look of the Parsonage. The tour begins at the front door where you walk into a small entry area and the living room.


When we lived in this home 16 years ago the rooms where all painted white, making this room look very different.
Thursday, March 7, 2013
THE NEW PARSONAGE
Hi everyone, I know it's been a while since I wrote a post, but it's been extremely busy here. We've been trying to get settled into our new home, and at the same time busy with projects. I know you've all been wondering where we live, so without further delay welcome to...
Here's the outside of our new home.

It's a ranch home built in 1962.
The Parsonage
Here's the outside of our new home.

It's a ranch home built in 1962.
Wednesday, February 27, 2013
MOVING ACROSS COUNTRY
Hi everyone! I'm glad to be back after being absent for a few weeks while we were moving across the country. A BIG thank you to everyone who helped me with guest posts. I'm thankful to report our move went well. I was a bit nervous about the thought of moving and traveling 1700 miles on winter roads, and many miles on mountain roads. I'm thankful for answers to prayers, the Lord provided dry roads and safe travel.
Today I thought I'd share a few photos of the final days - packing up the trucks. The final day of packing we woke up to a beautiful morning and this was the view across the road from our home. Oh how I will miss the breath taking view.

We rented two 26 foot trucks along with a dolly to tow our car. Four men from our new congregation in Minnesota flew out to help with the packing and driving the trucks, while my husband and I drove our pickup pulling out boat.


Everything had to be packed very tight to save space and ensure no shifting while on the road. Heavy items such as books where placed in the front of the truck.


The furniture was covered with blankets first, followed by shrink wrap to keep the blankets in place. We wrapped the legs on the furniture with bubble wrap and then shrink wrap. We used up two small and two large shrink wrap rolls. I think we also used up 10 + rolls of packing tape for all the boxes.

My husband built a plywood ramp out of the house for easier loading, eliminating the need to go down steps.
We were so thankful for all the people who helped with our move. We had help from our congregation in Lynden along with the men from Minnesota. Our granddaughters even gave us a little help.


My husband built some wracks to place odd shaped furniture on. This made it possible to stack other items on top of furniture. He also built crates around items like the lawnmower and exercise equipment. By doing this we were able to make use of all the space in the trucks.


Today I thought I'd share a few photos of the final days - packing up the trucks. The final day of packing we woke up to a beautiful morning and this was the view across the road from our home. Oh how I will miss the breath taking view.

We rented two 26 foot trucks along with a dolly to tow our car. Four men from our new congregation in Minnesota flew out to help with the packing and driving the trucks, while my husband and I drove our pickup pulling out boat.


Everything had to be packed very tight to save space and ensure no shifting while on the road. Heavy items such as books where placed in the front of the truck.

You can't have to many blankets. We had 10 dozen blankets and used all of them.

The furniture was covered with blankets first, followed by shrink wrap to keep the blankets in place. We wrapped the legs on the furniture with bubble wrap and then shrink wrap. We used up two small and two large shrink wrap rolls. I think we also used up 10 + rolls of packing tape for all the boxes.

My husband built a plywood ramp out of the house for easier loading, eliminating the need to go down steps.
We were so thankful for all the people who helped with our move. We had help from our congregation in Lynden along with the men from Minnesota. Our granddaughters even gave us a little help.

One to supervise and the other to help pack boxes :)

My husband built some wracks to place odd shaped furniture on. This made it possible to stack other items on top of furniture. He also built crates around items like the lawnmower and exercise equipment. By doing this we were able to make use of all the space in the trucks.

The men giving their backs a rest.
We finished loading the trucks by noon on Saturday, giving us the opportunity to show our guests the beautiful country side we lived in.

Mt Baker and the Twin Sisters - view behind the Parsonage.

The Puget Sound.

Deception Pass
My next post I'll share about our new home....
The Parsonage.
Subscribe to:
Posts (Atom)